Account Registration
Octo's cost and usage data rely on the registered cloud service provider's account. In the account page, CSP's accounts are registered, listed, updated and deleted.
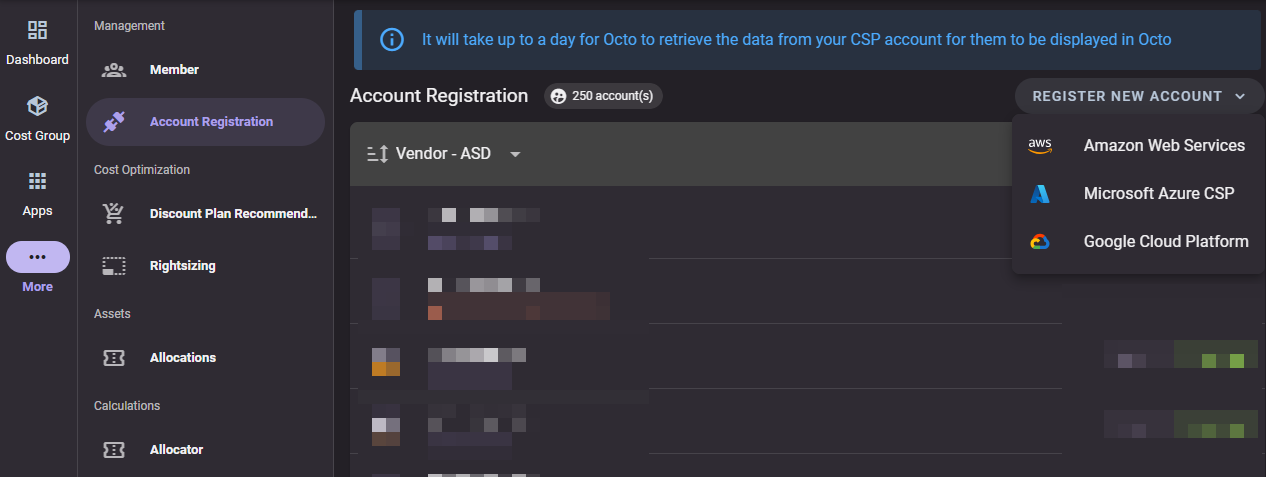
Registering an account
Account registration enables the user to register the source of data in Octo. As of now, Octo supports AWS, Azure and GCP vendors. This is only accessible to admin users.
After successful account registration, it will take up to a day for Octo to retrieve the data from your CSP account for them to be displayed in Octo.
Currently we have 2 steps in registering AWS account in Octo. First is through AWS console, which requires you to sign-in to you account and involves deploying stacks or stackset in your AWS account. Second option is using Terraform module, you can use our terraform module to deploy the necessary resources in your AWS account.
Via AWS Console
-
Select Registration Method. Choose Connect via AWS Console.
-
Basic Details. This step will save your account's Id and name if provided.
a. Input your AWS Account Id (12 digits).
b. Input Account Name (Optional).
c. Click Register Account.
d. If there is no error, then click Next.
-
Setup API Access. In this step it will deploy a stack in your AWS account, this will setup needed permission to allow Octo to perfome API Operation in your account.
a. Click Open AWS create stack page. This will bring you create stack page in your currently signed-in AWS account, make sure you deploy the stack in your intended account, default region would be
us-east-1.b. Please check default values when creating stack:
-
Stack name (You can retain the value or input your desired stack name.)
-
ExternalId (Do not change.)
-
Principal (Do not change.)
c. Tick the checkbox to agree the I acknowledge that AWS CloudFormation might create IAM resources with custom names. message.
d. After checking the stack details, click Create stack button. If create stack is success, go back to Octo.
e. Click Check and Confirm to verify the deployment.
f. If verification is success, it would check whether your account is a linked or payer account. If it is linked, you can click the Confirm and Finish button to finish the registration. If payer then click next to proceed with additional steps for payer accounts.
-
-
Setup Multiple API Access - Optional (Payer Only). This step will use stackset to deploy API Access in all linked accounts under the payer account. This is useful if your organization have many linked accounts that you want to register to Octo.
a. Click Open AWS create stackset page. This will bring you to create stackset page in your currently signed-in AWS account, make sure you deploy the stackset in your intended account.
b. In the create stackset page, follow this guide: Setup multiple account API Access using stackset
c. Click check and confirm. This will verify you stackset deployment.
d. If success, you can click Next.
-
Setup CUR and S3 bucket (Payer Only). This will deploy stacks for setting up CUR definition in your account, it will also setup a bucket to store your CUR data. You can choose whether to proceed with the default configuration or target S3 bucket in a different region. Another guide can be found here
a. Click AWS create stack page. This will bring you create stack page in your currently signed-in AWS account, make sure you deploy the stack in your intended account.
b. Click check and confirm. This will verify you stack deployments.
d. If success, you can click Confirm and finish.
Via Terraform
-
Select Registration Methodd. Click Via other options, choose terraform.
-
Basic Details. This step will save your account's Id and name if provided.
a. Input your AWS Account Id (12 digit).
b. Input Account Name (Optional).
c. Click Register Account.
d. If there is no error, then click Next.
-
Check this terraform module and read the README section.
-
If the deployments are successful, click Check and confirm to verify.
-
You will see the status of the deployments for API Access, CUR and S3 bucket (Payer account only), and multiple account API access - optional (Payer account only).
-
If API Access is success, you can click Confirm and Finish.
Registering Azure CSP Payer Account involves 3 steps, Basic Details, Partner Center Credentials, and Partner API Credentials.
Note: You can only register one payer account as of now.
-
Basic Details
a. Input your preferred acount name (Optional).
b. Click Next.
-
Partner Center Credentials
a. Input your Client ID, Application ID, and Secret key to procceed.
b. Click Register Credentials. This will verify your input credentials.
c. If success, you can now click Next.
-
Partner API Credentials
a. On this step, you can verify your MPN ID, Directory (Tenant ID), and Application ID.
b. Input your secret key.
c. Click register credentials. This will open a new tab on which you will require to sign-in in to your account. The goal of this step is to obtain an authorization code which is needed on the next input.
d. Input the code.
e. Click confirm and register.
To register your billing account in Octo, you must follow these steps.
-
Basic details
a. Input your preferred name for your billing account (Optional).
-
Export billing data to BigQuery
a. Follow the instructions, you can also read this guide for more detailed steps.
-
Add BigQuery permission
a. Follow the instructions, you can also read this guide for more detailed steps.
-
Register Billing Account
a. Input your billing account ID.
b. Input your project ID (This is where you dataset is hosted).
c. Input BigQuery dataset name.
d. Input BigQuery dataset region.
e. Click confirm and register.
Account List
All registered accounts are displayed on the account page with the status of the account registration and their account type. To see account list, click More on the sidebar and select Account Registration.
Different account status are (Applicable to AWS accounts only):
API - API access is established. Applicable to Payer and Linked accounts.
PAYER - Payer account is set on the linked account. This is only applicable to linked accounts since payer accounts automatically sets itself as the payer account.
CUR - CUR and S3 bucket setup is successfuly setup. Applicable to payer accounts only.
STACKSET - Stackset for multiple accounts api access is successfully setup. Applicable to payer accounts only.
Edit Settings
You can choose to edit you CSP account by clicking the account you want to edit and on the right side click the Kebab menu icon and select Edit Settings.
-
In the basic details section, you can only update the account name.
-
Next steps are specific on what CSP account vendor you are trying to edit. It is similar process on registering an account.
Delete Account
Delete account removes the account from our database. To delete an account, click the account you want to delete and on the right side click the Kebab menu icon and select Delete Account